Anatomy is one of the subjects incoming Pathologists’ Assistant students might worry about, especially if they don’t have a strong anatomy background from their undergraduate degree. It’s easy to assume you need to master a comprehensive anatomy textbook before day one.
You don’t. PA students need a solid, functional understanding of anatomy, but the depth and focus are different from what’s expected in other medical professions. This article covers what that functional understanding looks like, where to focus your study time, and what you can safely leave for later.
How Much Anatomy Does a Pathologists’ Assistant Student Need?
How much anatomy study you need depends heavily on your background coming into a program.
Students entering PA school with a strong anatomy background from undergraduate studies or a previous degree may find they don’t need a dedicated anatomy textbook at all. Students with little or no previous anatomy experience will benefit from spending more time building this foundation, but that doesn’t mean starting with the most comprehensive anatomy resource available.
The sections below cover the areas that matter most for a PA, and the areas that deserve less of your time.
Prioritize Anatomical Terminology and Orientation
Some of the most relevant anatomical knowledge for a PA is the terminology used to describe location, orientation, and the relationships between structures. Start with anatomical position, then become comfortable with terms such as:
- Superior and inferior
- Anterior and posterior
- Medial and lateral
- Proximal and distal
- Dorsal and ventral
- Superficial and deep
- Cranial and caudal
- Ipsilateral and contralateral
All of these terms refer to the patient in anatomical position (standing upright and facing forward, with the arms at the sides and palms forward), regardless of how the patient was positioned during surgery. Superior always means toward the head and inferior toward the feet, even if the specimen was removed with the patient lying prone. A few region-specific terms are worth knowing as well: palmar (or volar) for the palm of the hand, plantar for the sole of the foot, and dorsal for the back of the hand or the top of the foot.
It’s also worth knowing the anatomical planes used to divide the body: the transverse (or axial) plane, the coronal (or frontal) plane, and the sagittal plane. Each one relates directly to the terms above. A transverse plane divides the body into superior and inferior portions, a coronal plane divides it into anterior and posterior portions, and a sagittal plane divides it into left and right portions, along the medial-lateral axis. The same planes can also be used to describe how an organ or specimen has been sectioned. Margins work the same way. A margin can be sampled perpendicular to the incised surface or parallel to it (an en face or a shave section), and each approach tells the pathologist something different about how close a lesion comes to that margin.
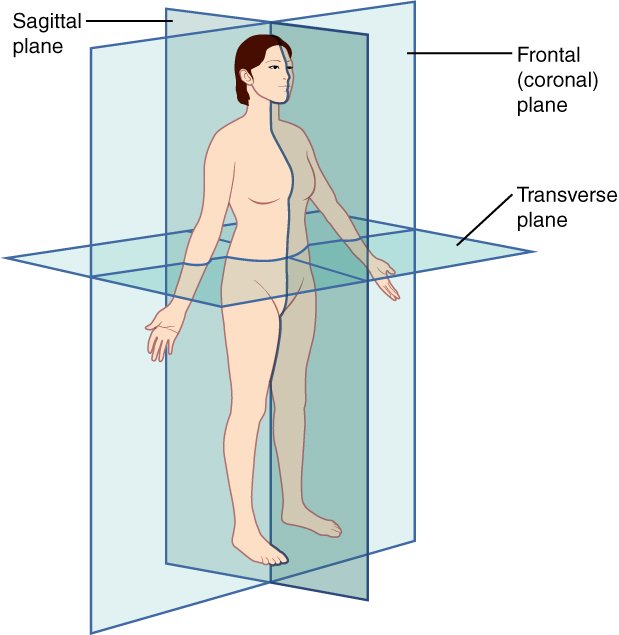

These terms are used routinely when orienting surgical specimens, describing lesions, communicating with pathologists, and writing gross descriptions. You need to be fluent with them: not just able to define them, but able to apply them to actual specimens.
For example, on a bowel resection proximal means toward the oral end and distal means toward the anal end. On an imaging report, craniocaudal means head to tail or essentially top to bottom. Being able to orient or apply those terms to the specimen in front of you is far more useful than memorizing the origin and insertion of every muscle in the lower extremity.
Focus on Organ Systems and Anatomical Relationships
Beyond terminology, PA students should have a broad understanding of the major body systems (e.g., cardiovascular, respiratory, digestive, genitourinary) and how structures relate to one another. You should know where the major organs are located, what their defining features are, what structures they connect to, and how each organ system is organized.
For example, when studying the cardiovascular system, you should understand the basic path of circulation: deoxygenated blood returns through the superior and inferior vena cava to the right atrium, passes into the right ventricle, and travels to the lungs for oxygenation. Oxygenated blood returns to the left atrium, enters the left ventricle, and is pumped into the systemic circulation.
This kind of relational understanding pays off when learning pathology. Knowing the route of blood flow through the body helps you answer questions such as why many cancers spread to the lungs first (systemic venous blood returns to the heart and passes through the lungs before reaching the rest of the body, so cancer cells that enter the bloodstream often get “stuck” in the lungs’ small vessels), while colorectal cancers tend to reach the liver first (via the portal vein). Similarly, a clot from the leg normally lodges in the lungs as a pulmonary embolism. If it causes a stroke instead, it had to bypass the lungs, which points to a right-to-left shunt in the heart (such as a patent foramen ovale).
Relational understanding also helps at the grossing bench. Complex resections bring several organs out together, and knowing how those structures sit in relation to one another is what lets you orient the specimen, identify margins, and find the structures you need to sample.
A good example is a Whipple specimen, which combines a portion of the duodenum, the distal common bile duct, and the head of the pancreas in a single resection. These specimens can be difficult for new PA students to orient, but if you can recognize each tissue and know how they fit together, you can work out where everything is and find and ink the relevant margins (e.g., the pancreatic neck, vascular groove, and the uncinate margin).
Most Common Ways I Use Anatomy
Day to day, I rely most on anatomical terminology and orientation for a few common, repetitive tasks. Setting autopsy aside (most of my time, like most PAs’, is spent grossing surgical specimens), these mostly come down to orienting common specimens:
- Mastectomies/lumpectomies (using the surgeon’s orientation markers to identify each margin before inking and using imaging reports to localize tumors within breast specimens)
- Uteri (which side is anterior and which is posterior; the round ligament is most anterior, followed by the tubes and then ovaries)
- Small and large bowel resections (which end is proximal and which is distal; sometimes you can tell and sometimes you can’t)
- Rectal specimens (the peritoneum extends further down on the anterior surface, which tells you front from back)
- Whipple specimens (described above)
Uteri and rectal specimens can often be oriented from their anatomy alone. Others have no reliable landmarks and depend on markers the surgeon adds.
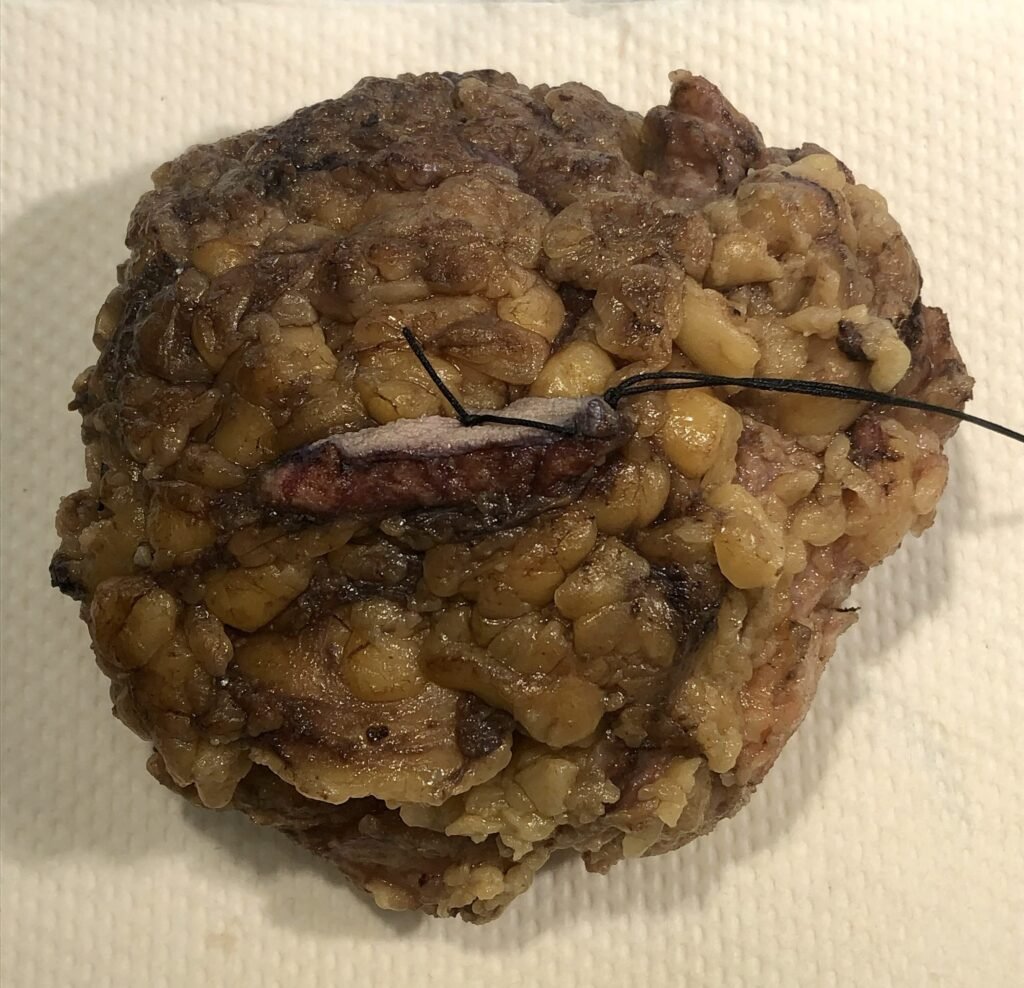
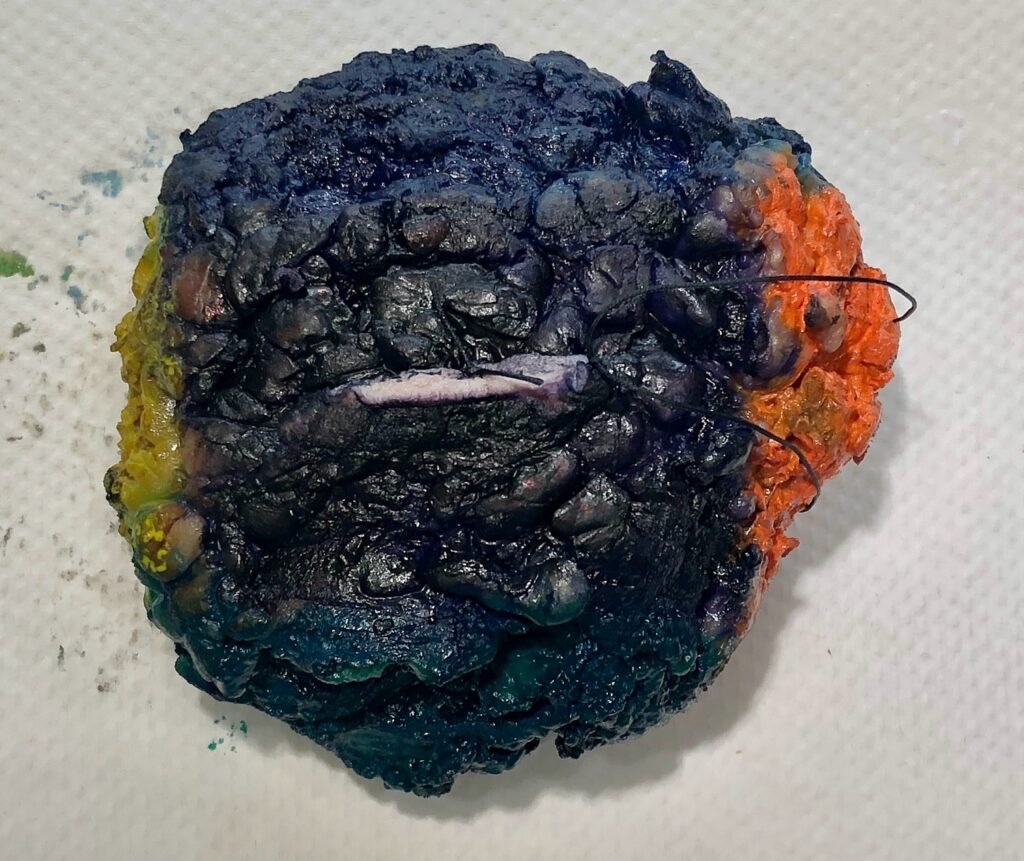
Many oriented excisions, like the breast specimen below, can be thought of as a box with six sides: superior, inferior, medial, lateral, anterior (superficial), and posterior (deep). Surgeons usually mark two of those sides with sutures placed at right angles to each other, and once two sides are known, the remaining four can be worked out. A common convention is a short suture for superior and a long suture for lateral, but this can vary between surgeons and institutions, so you can’t automatically assume that this is what these sutures mean. When in doubt, ask a coworker or check with the pathologist (or surgeon) before you start cutting. Once dissection is under way, the orientation is much harder to reconstruct.
Not Every Area of Anatomy Deserves Equal Study Time
Detailed musculoskeletal anatomy (e.g., memorizing individual muscle origins, insertions, actions, and innervation) is much less important for a PA than understanding major structures and how they relate.
Skeletal anatomy can usually remain fairly broad too. If someone describes a lesion in the tibia, you should immediately know that it’s in a long bone of the lower leg. You don’t need to memorize every bony landmark, but you should be comfortable enough to look up the detail in a more comprehensive text when you need it.
Anatomy Is Reinforced Throughout PA Training
One reason you don’t necessarily need a comprehensive anatomy textbook is that anatomy isn’t learned in isolation during PA training.
Normal microscopic anatomy is reinforced through histology. Organ structure and disease appear throughout Robbins (one of the standard pathology textbooks). Gross anatomy becomes increasingly important in surgical pathology, where dissection manuals explain the structures and relationships relevant to each specimen. All of this is supplemented by the anatomy taught in your didactic coursework and, eventually, by hands-on experience with surgical and autopsy specimens.
Together, these provide more than enough anatomical material for most new PA students.
Learn Anatomy in Context
As you move into clinical training, anatomy can increasingly be reviewed case by case. When you encounter an unfamiliar structure or need a more detailed understanding of a particular specimen, looking up the relevant anatomy at that moment is often more useful than trying to memorize everything in advance.
This approach also puts anatomy in context. Learning a structure while you’re holding the corresponding specimen makes it much easier to understand and retain. Keeping an anatomy reference within reach of your grossing station (or being ready to look up specimen anatomy online) makes this habit easy to keep.
Recommended Anatomy Resources
The right resource depends on your background and how you learn:
- The Anatomy Coloring Book (Kapit & Elson): an approachable starting point if your anatomy background is limited.
- Gray’s Anatomy for Students: my recommendation if you want a dedicated anatomy text. It pairs explanation and clinical context with illustrations. Just don’t confuse it with the full Gray’s Anatomy reference text, which is far more detailed than PA school requires.
- TeachMeAnatomy: a free (with an optional paid tier) online resource for targeted review alongside your coursework.
Key Takeaways
- You don’t need to master a comprehensive anatomy textbook before starting PA school.
- Fluency with anatomical terminology and orientation, applied to real specimens, is the highest priority.
- Orient every specimen before cutting, using anatomic landmarks or the surgeon’s markers, and ask a coworker or pathologist (or the surgeon) when orientation is unclear.
- Focus on organ systems and how structures relate to one another rather than fine musculoskeletal detail.
- Anatomy is reinforced throughout training through histology, pathology, dissection manuals, and hands-on work.
- Once you’re on rotations, look up anatomy as you need it, with the specimen in front of you.