If you spend any time in a pathology gross room, you will hear the term “photo mapping” come up again and again. It is a tool that is simple once you understand it, but it can be confusing if you have never seen it in action. This article will explain what photo mapping is, why Pathologists’ Assistants (PAs) use it, and how it helps both PAs and pathologists do their jobs better.
What Is Photo Mapping?
Photo mapping is exactly what it sounds like. A PA takes a photograph of a specimen after it has been sliced, and then draws labels or boxes directly on that photo to show exactly where each tissue section came from. Think of it like a map. But instead of showing streets and buildings, it shows slices of tissue and the exact spots where small pieces were removed for examination under the microscope.
Here is what the process usually looks like, step by step:
- The specimen arrives and is prepped. Most specimens sit in a preservative called formalin overnight so the tissue firms up and is easier to work with the next day.
- The PA takes initial measurements and a description. Before anything is cut, the PA records the size, shape, and appearance of the whole specimen.
- The specimen is sliced. The PA cuts through the tissue in even slices, often about half a centimeter apart. Many tumors cannot be seen from the outside and you only find them once you slice through the tissue.
- The slices are laid out in order. The PA arranges the slices on a plain background, like a blue towel, keeping them in the same order and orientation they were cut in. For example, slices might be laid out from top to bottom or left to right.
- A photo is taken. The PA uses a camera set up above the cutting area to take a top-down photo showing the cut surface of every slice.
- The photo is labeled. Using software, the PA marks the photo with the direction of the tissue (such as which side is closer to the head or the feet or left or right side) and then draws small numbered boxes over the exact spots where tissue sections were removed. Each box corresponds to a specific cassette, which is the small container that holds a piece of tissue as it becomes a slide.
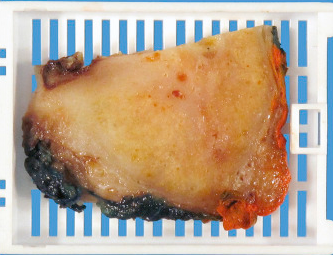
A cassette containing a piece of tissue
Some labs use specialized software built just for this task, such as PathSuite, MacroPath, or PathCam, which include built-in tools for drawing and labeling. Smaller labs without this kind of software might use general programs like Microsoft Paint, PowerPoint, or Snagit instead. Years ago, PAs would print the photos and hand-write their labels directly on the paper copy. Today, nearly everything is done digitally, and the finished photo gets attached to the electronic case file so the pathologist can pull it up alongside the written report.
Rules for a Good Mapping Photo
A photo map is only useful if the photo itself is clear and easy to read. There are a few basic rules that PAs follow to make sure of this.
- Use a neutral, clean background. White, black, and blue backgrounds all work well. Many labs use blue towels for this, which give a nice even background to work with. Clean also means clean. You want to avoid large streaks of blood or fluid on the background if possible, since these can distract from the tissue itself. The tissue should always be the main focal point of the photo, so anything that pulls attention away from it, like smears or pooled liquid, should be kept to a minimum.
- Fill as much of the frame as possible with the tissue. Since the tissue is usually laid out on a towel, the goal is to zoom in as close as possible without cutting off any part of the specimen. The photo should look like a picture of the tissue with a little bit of towel showing around the edges, not a picture of the towel with a little bit of tissue somewhere in the middle.
- Include a scale reference. Some photo software has a built-in measurement tool that stamps a scale directly onto the photo, but these tools are not always accurate. Many PAs prefer to place an actual ruler somewhere in the frame instead. That way, if a pathologist ever needs to measure something on the photo later, they know exactly what scale they are working with.
- Label the photo with orientation and the case number. Every mapping photo should be marked with the specimen’s orientation, such as which side is superior, inferior, medial, or lateral, along with the case number it belongs to. This makes sure the photo can always be matched back to the correct case and understood correctly, even if it is viewed on its own.
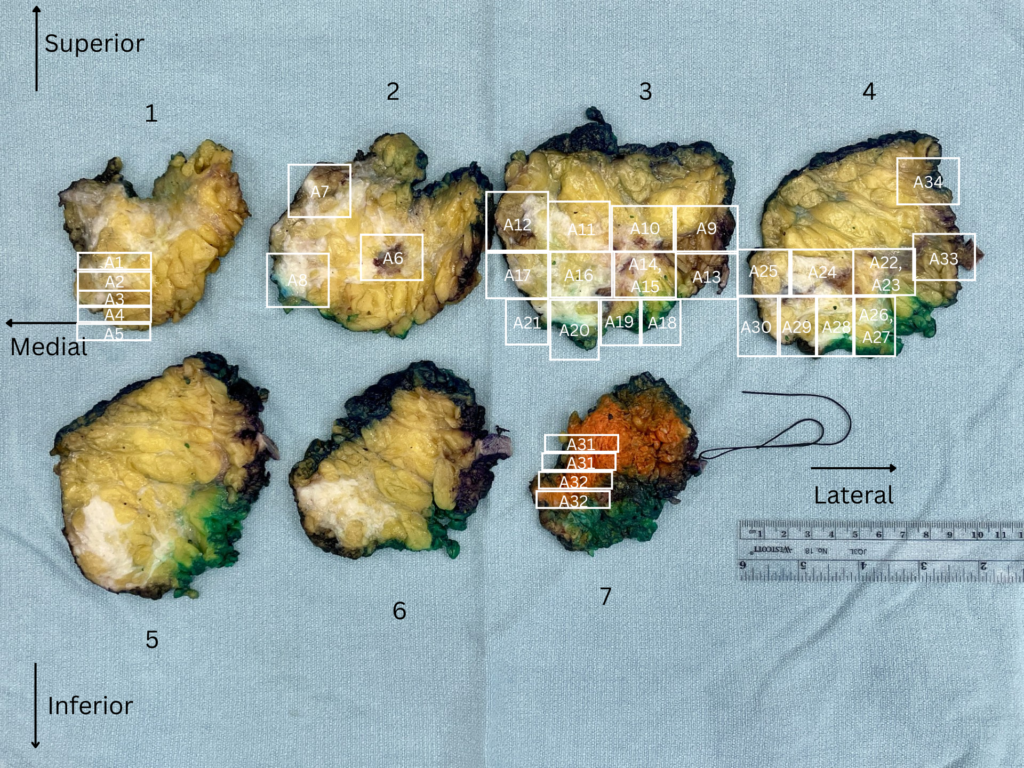
A mapped breast specimen showing the above rules in action: a clean towel background, tissue filling most of the frame, a ruler for scale in the corner, and clear orientation labels (medial, lateral, superior, inferior) alongside numbered section boxes. This photo has been de-identified and the case number removed.
Why Photo Mapping Matters for PAs
It Helps You Keep Track of Complex Cases
Some specimens are simple. If a PA is only taking two or three tissue sections, it is easy to remember exactly where each one came from without any extra help. But complex cases are a different story. A single specimen can require thirty, forty or more individual sections. Without a visual record, it becomes very difficult to keep everything straight, especially in cases with irregular anatomy or multiple margins located close together.
Photo mapping is most valuable in cases where the area of concern is hard to identify with the naked eye. This includes situations like:
- A tumor that has been partly destroyed by chemotherapy, leaving only irregular scar tissue behind
- A tumor type that spreads in small clusters instead of forming one solid mass
- A case with more than one tumor in different locations
- A biopsy site that has already started to heal, making the original area hard to find
In these situations, a PA is often making an educated guess about which slices contain the area of concern. If several slices might be involved, a photo map shows exactly which piece of tissue matches which slide. This lets the pathologist mentally rebuild the shape and size of the abnormal area once they look at it under the microscope, since the slides alone will not tell them how the pieces relate to each other in space.
Photo maps are also a huge help when someone has to return to a case later. This might be the original PA coming back days later, or it might be a coworker covering for someone who is out sick or on vacation. Without a map, figuring out exactly where a specific section came from can mean reviewing the gross description, looking at the leftover tissue and trying to reconstruct what happened. With a photo map, the answer is right there. Labs also physically preserve the layout of the sliced tissue by rolling it up in the towel it was laid out on, so if someone needs to go back to the actual tissue later, unrolling the towel puts everything back in the same order as the photo.
It is worth being honest that photo mapping adds time to the grossing process. Laying tissue out, photographing it, and annotating the image all takes extra time. But most PAs would agree that a little extra time up front is worth it. It is much better to spend slightly longer on every case than to spend an hour struggling to reconstruct a case that was never mapped and now needs more tissue.
It Helps You Communicate With the Pathologist
The other major reason PAs use photo mapping is to communicate clearly with the pathologist. A written gross description can only say so much. A pathologist reading a report with twenty or thirty sections (or more) listed by number has to build a mental picture of the specimen using words alone. A photo does this job far better and far faster. It shows the pathologist exactly where the tumor was seen, where the closest margins were located, and where any extra or random sections were taken from.
This has several real benefits:
- Faster sign-out. Pathologists can look at the photo and immediately understand the layout of the case instead of piecing it together from a list of section numbers.
- Fewer callback questions. When a pathologist needs more tissue, they can point to the exact spot on the photo instead of describing it in words, which saves time for everyone.
- Better accuracy. Photo maps make it much easier to correctly match microscopic findings to their real location in the specimen, which matters for measuring tumor size and reporting distances to margins.
Photo Mapping in Different Specimen Types
Mapping is used most often in a few specific specimen types, though the exact rules vary by lab.
Breast specimens are the most common example. At many labs, mapping is commonplace for malignant breast cases, which is a change from years ago when it was only used for more complicated cases. A typical breast case might involve slicing a lumpectomy specimen into five to ten pieces, laying them out in order, and photographing the cut surface.
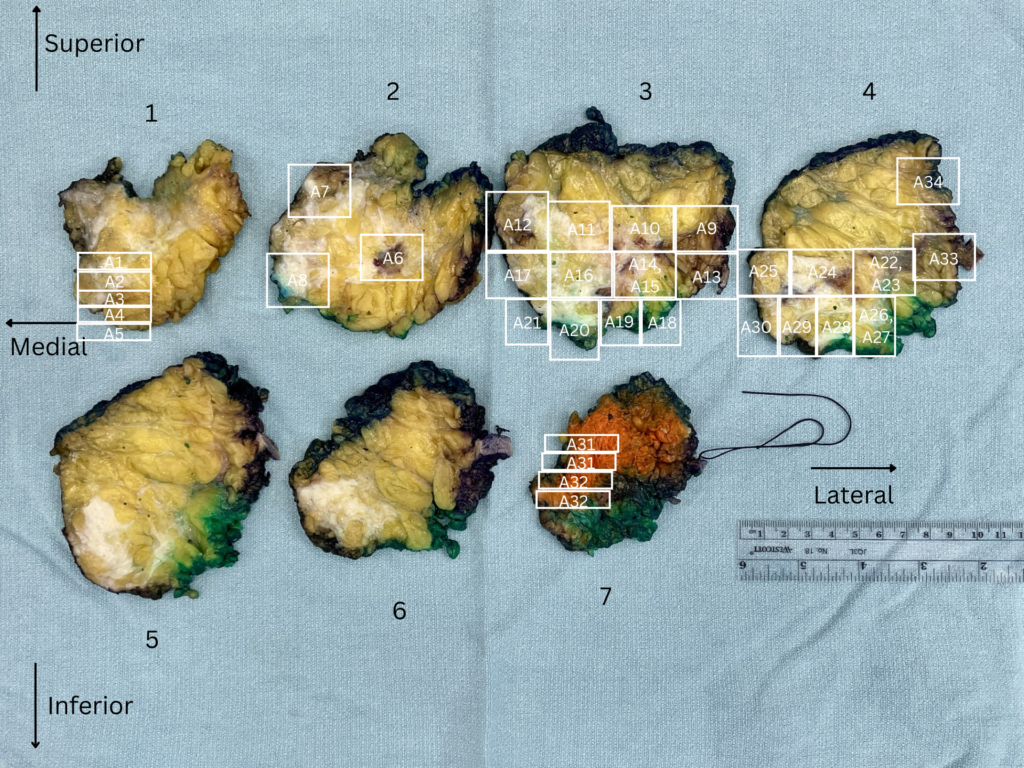
The PA then draws numbered boxes showing where sections of the tumor were taken, followed by boxes for the closest margins, and finally boxes for any additional normal tissue sampled around the tumor.
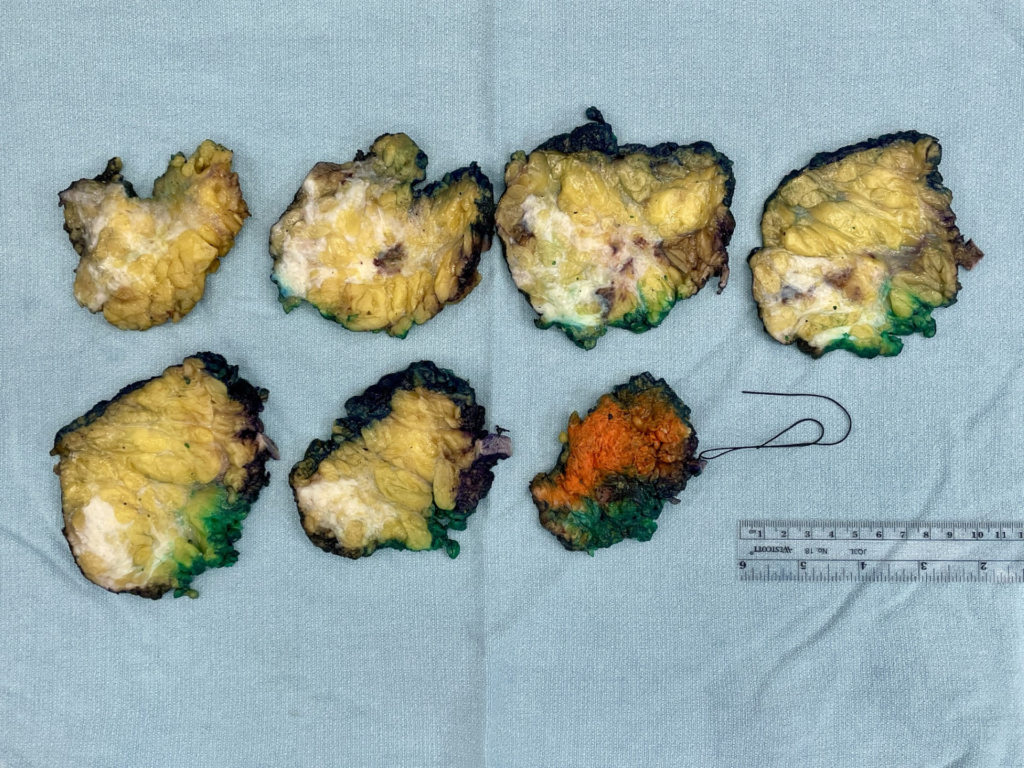
A breast specimen sliced into consecutive pieces and laid out on a clean background, photographed before any annotation is added.
The same specimen after mapping. Numbered boxes show exactly where each slide comes from.
Mapping is especially useful in cases involving DCIS, tumors treated with chemotherapy before surgery, lobular carcinoma, or multiple tumors in the same breast, since all of these can be very difficult to see clearly.
Lung specimens are another common example. Sometimes a tumor that looked small during grossing turns out to be much larger once the slides are reviewed. Photo maps help the pathologist see how the random and targeted sections relate to each other, and they make it much easier to go back and take additional tissue if a secondary finding shows up somewhere unexpected.
Thyroid specimens are often mapped when a gland contains several separate nodules and not every nodule is being fully submitted. Pathologists frequently need to match up their microscopic findings with results from an earlier needle biopsy of a specific nodule. When there are multiple nodules close together, a photo map makes it much easier to confirm that the correct nodule was sampled and matched to the correct biopsy result.
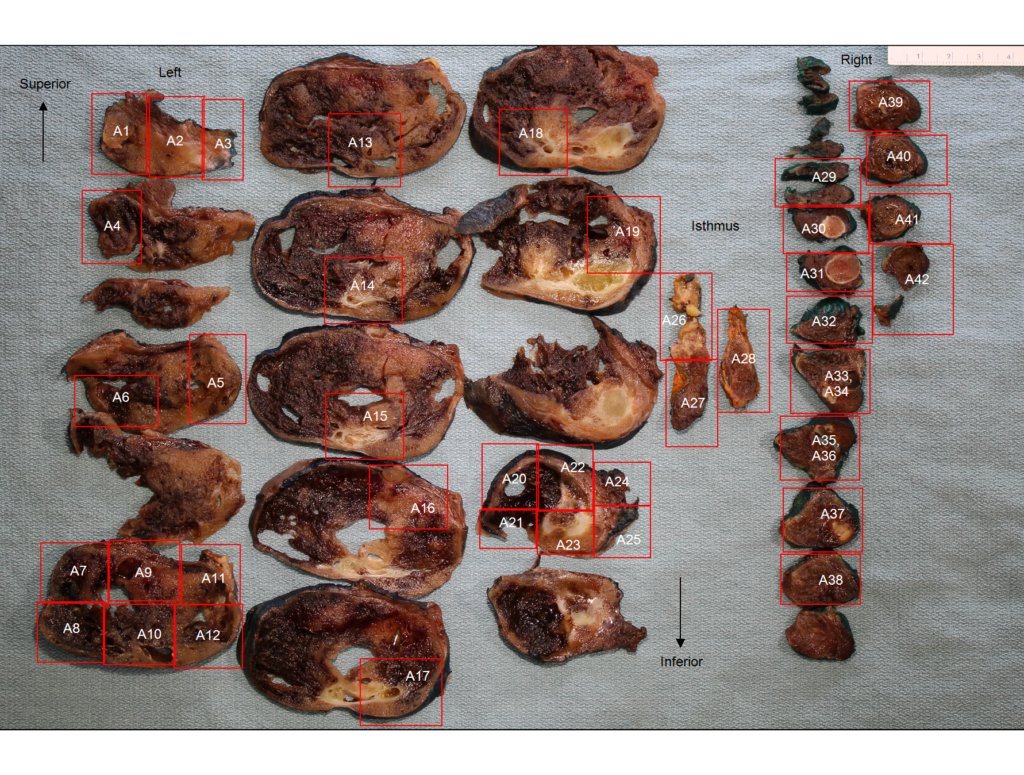
A thyroid with several nodules across both lobes and the isthmus. Numbering each section makes it possible to trace any single nodule back to its exact slice, even when the tissue has been sliced into dozens of pieces.
GI specimens cover several different situations. Whipple resections, which remove parts of the pancreas, small intestine, and bile duct, have complex anatomy with several margins close together, so mapping helps show exactly where sections and margins were taken from. Photo mapping is also useful for cases where a small polyp removed during a colonoscopy turns out to be cancerous, since the original polyp site can be very hard to locate once the larger piece of colon is removed later. Esophagus and stomach resections present a similar challenge, especially after chemotherapy has partly treated the tumor, or in a specific type of stomach cancer that spreads outward without forming an obvious mass. In these cases, random sections may turn out to contain cancer even far from where the main tumor was seen, and the pathologist may need to go back and add more sections, using the photo map to track exactly where each new section is taken from.
Rectal cancer resections, often called TME specimens, are also good candidates for mapping. Many of these patients receive chemotherapy or radiation before surgery, which can shrink the tumor down to a thin patch of scar-like tissue that is much harder to spot than the original cancer would have been. Mapping the sliced specimen lets the PA show exactly which slices were taken through this treated area, which helps the pathologist confirm how much cancer, if any, is left behind as well as assess the tumor distance to the closest surgical margin.
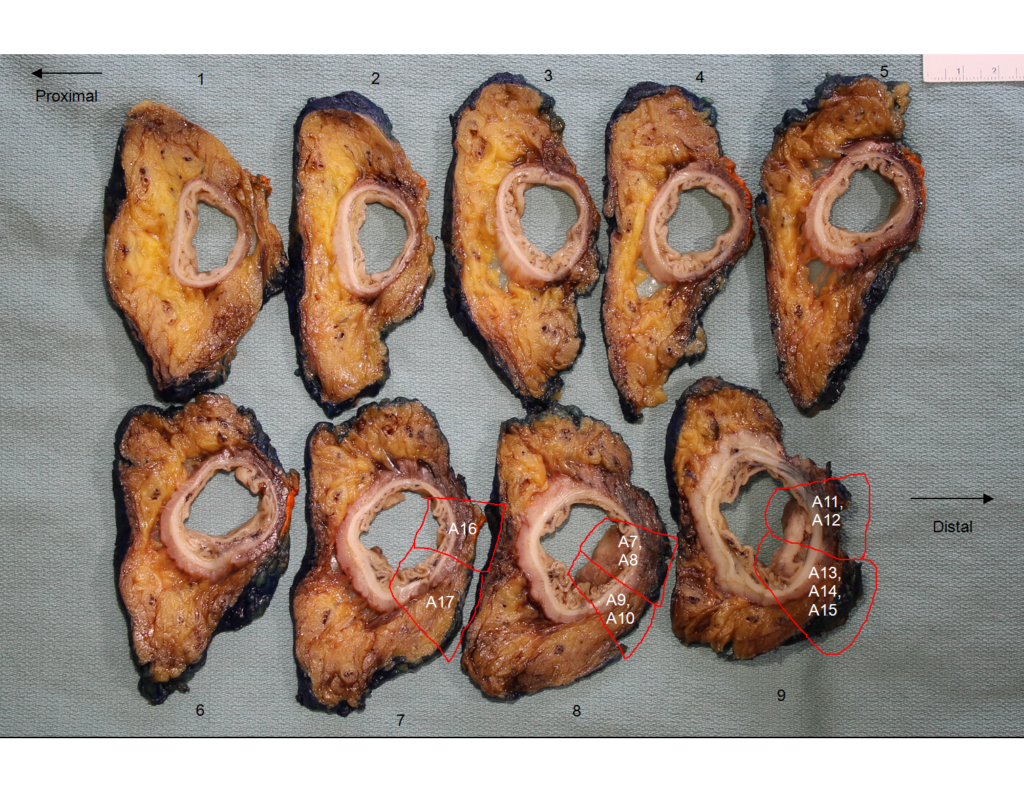
A TME (total mesorectal excision) specimen from a patient who received chemotherapy and radiation before surgery. The suspected treated tumor site is outlined and numbered across several consecutive slices, helping the pathologist confirm exactly how much tumor remains after treatment and how close to the surgical margin (the blue edges) it is.
Why This Matters for You as a Future PA
Photo mapping is a skill that combines observation, organization, and clear communication, three things that matter in almost every part of a PA’s job. As a PA student or someone considering this career, understanding photo mapping gives you a real sense of what a normal day in the gross room can involve. It also shows how much of this job is not just about identifying and cutting tissue, but about making sure everyone downstream, especially the pathologist, has everything they need to give the patient an accurate diagnosis.
If you go on to train as a PA, do not be surprised if photo mapping becomes one of the more routine parts of your day. It might feel like an extra step at first, but it quickly becomes second nature, and most PAs will tell you it saves far more time than it costs.